The custom report designer lets you design your custom report by adding column headings and choosing the fields you want to include in the report, and formatting the fields to attain the desired results.
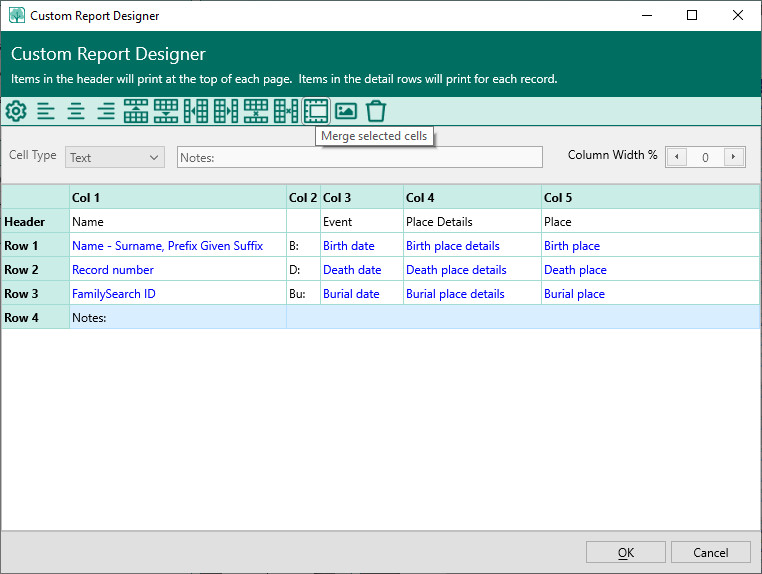
The Custom Reports Designer is divided into two sections. The toolbar and the cell definition fields are in the upper part of the window, while the report workspace is in the lower portion. The workspace includes the header that shows what the fields contain, while the rows below that contain the actual details that will appear for each person in the report. The Options button lets you define a title for the report, the sort sequence and any spaces you wish to have between entries.
Toolbar Commands
•Options - Lets you select various options for your custom report
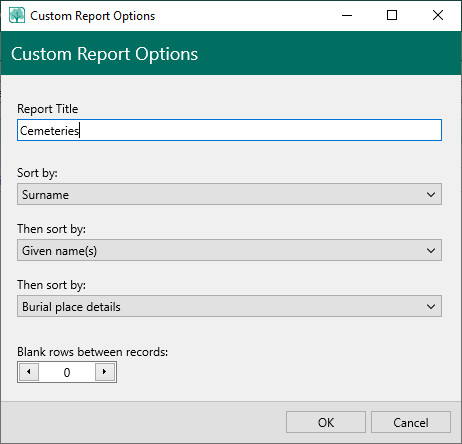
➢Report Title – Enter the title you want for your report.
➢Sort by – RootsMagic provides 3 sort levels to sort your report by. RootsMagic will first sort by the 1st sort field, and then will sort duplicate items within that sort order by the 2nd sort field, and so on.
➢Blank rows between records – Enter the number of blank rows you want between records on your report. If this is zero, then there are no blank lines between records.
•Align left – Aligns the contents to the left of the field. The shortcut key is Ctrl+L
•Align center – Aligns the contents centered in the field. The shortcut key is Ctrl+E
•Align right – Aligns the contents to the right of the field. The shortcut key is Ctrl+R
•Insert row above - Inserts a new blank row above the highlighted row
•Insert row below - Inserts a new blank row below the highlighted row
•Insert column to left - Inserts a new blank column to the left of the highlighted column
•Insert column to right - Inserts a new blank column to the right of the highlighted column
•Delete row - Deletes the highlighted row
•Delete column - Deletes the highlighted column
•Merge cells - If you select multiple cells (hold down the mouse and drag to select multiple cells), this will merge all those cells into a single larger cell
•Unmerge cells - If you select a merged cell, this will unmerge it back into its individual cells
•Clear selection - This will delete the contents of all selected cells.
Cell Definitions
The next row contains the three cell definition fields, Cell Type (Text or Field), cell contents (text string when field type = Text, or <<Select field>> when Field type = field), and cell width (sets the percentage of the display that you want a column to occupy – 0% lets the program decide on the width.) When you select a cell in the grid, the cell definition will display the current values of that cell, and you can edit those values.
Header Row
The Header row displays the text that appears at the top of each column. The Cell Type for the header is Text only. Header cells cannot be merged together. To create a Title for the report that spans the report, click the Options button, and enter the title in the first field in the Options dialog.
Data Rows
The rows beneath the header displays the text or field contents that form the body of the report. Any number of rows and fields can be defined and they will all be displayed for each person selected to appear in the report. You can select a number of cells in a column below one another or a number of cells in a row beside one another and merge these cells together using the "Cell, Merge cell" menu command, or the merge toolbar button, or Alt+M.
If you enter Text into a cell, that text will be printed for every record (person) in the custom report. If you enter a field into a cell, RootsMagic will print the value of that field (date, place, etc) for that person in the cell. Some field types can contain more than one value. In that case, RootsMagic will print each of the possible values in the same cell. For example, if you enter "Spouse name" in a cell, and the person has 3 spouses, all 3 spouse names will be displayed in that cell.