The Individual summary gives you all the information available for the highlighted person on the main program screen. The report is divided into an individual section and a marriage section, showing all the facts, dates, places, and spouses if appropriate. You also can include a photograph of the highlighted person.
To print an individual summary:
1.Select the Publish page
2.Select "All reports and charts"
3.Select "Individual Summary"
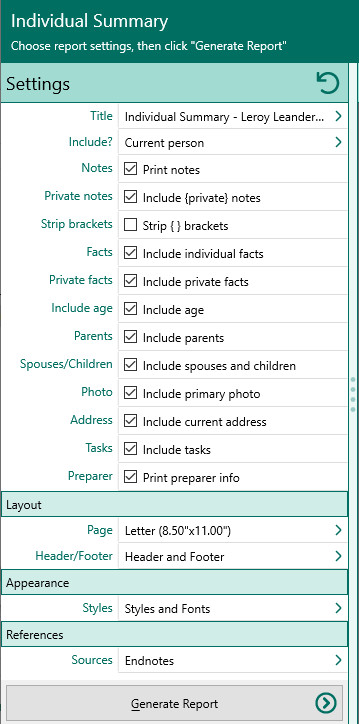
4.Select your options from the Report Settings panel:
A.People to include – Choose whether you want to include everyone in your database, a selected list of people, or a named group of people. If you choose "Select from list", the people button beside the field changes from gray tones to color and RootsMagic opens the "Select people" screen to let you to select the people to include by marking the checkbox beside the names of the desired individuals. Click OK to close the dialog. You can click on this color button to re-open the "Select People" screen to change your selection.
B.Notes - Mark this checkbox to print the notes for the person.
C.Print private notes – Mark this checkbox to print any private notes.
D.Strip brackets – Mark this checkbox to have RootsMagic remove the privacy brackets if you print private notes
E.Individual facts - Mark this checkbox to print the facts for the person (i.e. birth, death, etc).
F.Print private facts – Mark this checkbox to print any private facts.
G.Age at events - Mark this checkbox to print the person's age for events (if possible)
H.Parents - Mark this checkbox to print the names of the person's parents on the summary.
I.Spouses / Children - Mark this checkbox to print the person's spouses and children on the summary.
J.Photo - Mark this checkbox to print the person's preferred photo on the summary.
K.Current address - Mark this checkbox to print the person's current address on the summary.
L.Tasks – Mark this checkbox to include the person’s tasks
M.Print preparer information - Mark this checkbox to print the preparer's name and address at the end of the list. You enter the preparer's name and address from the "Settings, Preparer" dialog.
5.Choose the various layout and style settings for the report
6.Click the "Generate Report" button to generate the report and display it in the Report Viewer. From there you can modify the report settings, send the report to your printer, or save the report to disk.