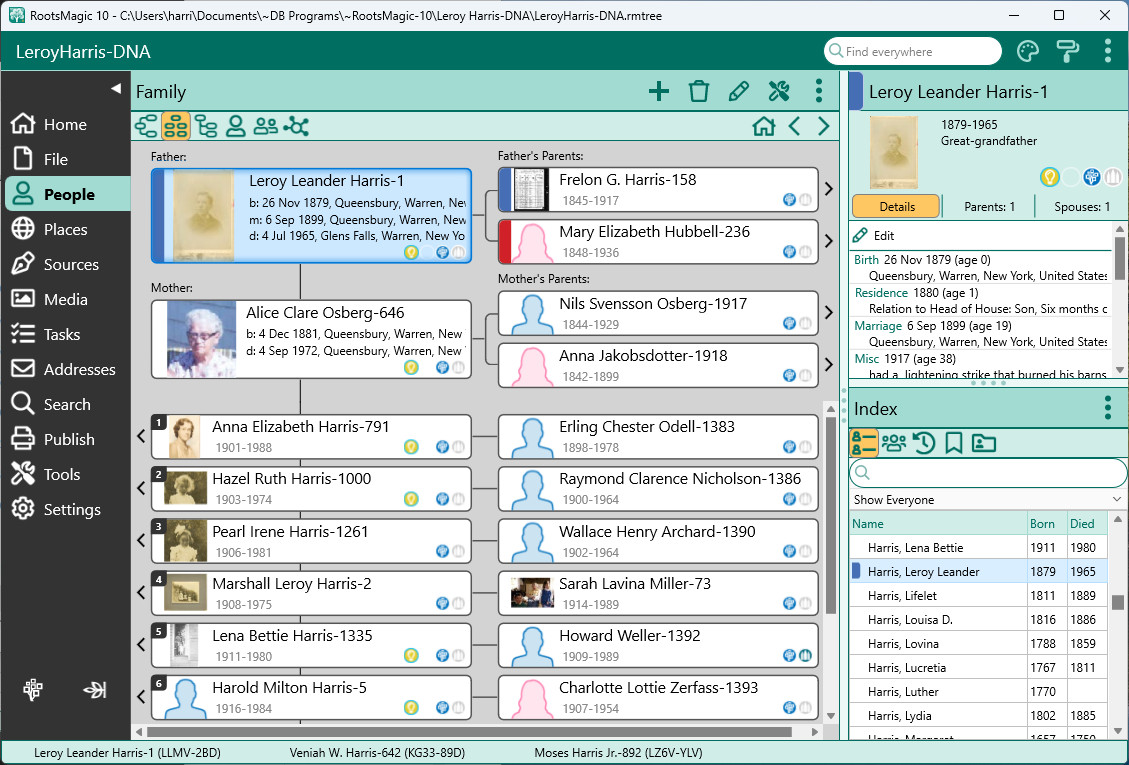
How To Edit a Person
1.Double click the person´s name on any view in the People page
2.or highlight the person’s name and press Enter
3.or right click on a person's name and select Edit person
4.or highlight the person's name and click the Edit button in the side info panel
The Edit Person form has 4 views, which you can switch between using the side menu on the left. You can click the left arrow at the top of the menu to collapse or expand it.
a.Info - which contains all the basic information for the person
b.Media - which displays all the media connected to the person
c.Health - where you can track any or all of a person's health conditions
d.DNA - where you can maintain copies of all the DNA matches you have for a person
The Info View
Besides the side menu, the Info view has 3 main sections:
1.Header - The top of the form contains the person's name, lifespan, and primary photo
2.Fact List - The left half of the form contains a list of facts for the person, including names, spouses, parents, groups, WebTags, and events in the person's life
3.Edit Panel - The right side of the form is an edit panel where you can make changes to whatever item is highlighted in the Fact List on the left
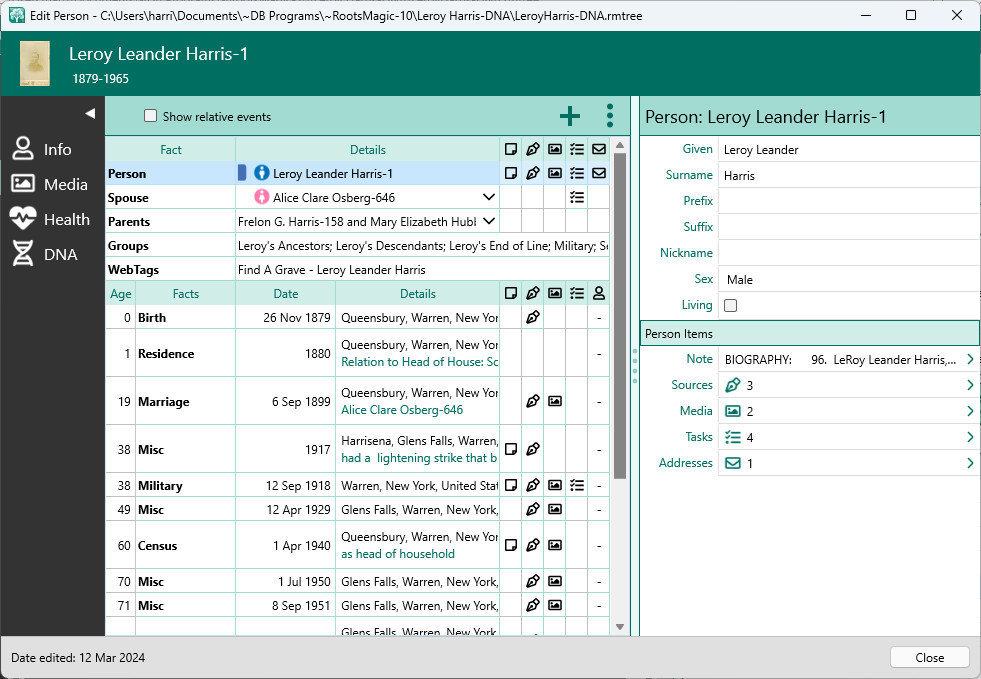
The Header
The header at the top of the Edit Person form contains the person's name and lifespan, as well as a thumbnail of the person's primary photo. You can click on the photo in the header to select a new primary photo for the person.
The Fact List
The fact list on the left side of the Edit Person form is a list of various pieces of information about the person.
Fact List Row Types
1.Person - The first row is always the Person row. It displays the name, sex, and whether there are any notes, sources, media, tasks, or addresses attached to the person. The name is the "primary" name for the person, but notes, sources, etc. for this row apply to the person and not the name. There is a "Primary Name" fact for every person which includes the same name, but where notes, sources, etc. apply to the primary name itself.
2.Spouse - The Spouse row will appear for each spouse or unmarried partner you have entered for the person. It will display the spouse name, sex, and whether there are any notes, sources, media, tasks, or addresses attached to the spouse family. The spouse row has a drop arrow on the right which you can click to switch to the edit screen of the spouse or any children with that spouse. If you do switch to another person, the header of the edit screen will display a left arrow to return to the original person.
3.Parents - The Parents row will appear for each set of parents you have entered for the person. It will display the parent names, and whether there are any notes, sources, media, tasks, or addresses attached to the parent family. The parents row has a drop arrow on the right which you can click to switch to the edit screen of the parents or any siblings in that family. If you do switch to another person, the header of the edit screen will display a left arrow to return to the original person.
4.Groups - The Groups row will display any groups that you have added the person to.
5.WebTags - The WebTags row will display any WebTags you have added to the person.
6.Facts - The remaining rows contain the facts you have added for the person, including primary and alternate names, events, associations, and attributes. Each row can contain a date, place, value, the age at the time of the event, and whether there are any notes, source, media, or tasks. If the fact is shared with other people in the file, you will also see a count of how many people it is shared with.
Adding a Fact
To add a new fact, click the + button above the fact list. Simply select the fact type you want to add from the fact type list and click OK. RootsMagic will add the new blank fact to the fact list for you to edit.
Editing a Fact
To edit an existing fact, simply select the fact in the fact list and begin editing the information on the right in the edit panel.
Deleting a Fact
To delete a fact, just select the fact in the fact list, then click the trash can icon. RootsMagic will ask you to confirm that you really want to delete the fact. Keep in mind that you can't delete any of the top rows (main, spouses, parents, WebTags, or Groups) from the Edit Person form.
Edit Person Options
The Edit Person form has a number of selectable options.
Option Form
Selecting Options from the option menu will display the Options form.
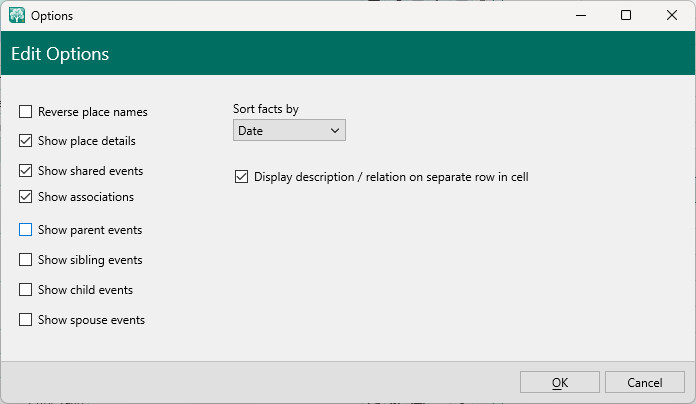
•Reverse place names - Check this to display place names in reverse (Country, State, County, City). This is useful to see the events grouped geographically.
•Show place details - Check this to display any place details in the fact list.
•Show shared events - Check this to display any shared events in the fact list.
•Sort facts by - Choose what order to display the facts in the fact list.
•Display description / relation on separate row in cell - Check this to have RootsMagic use 2 rows per fact. Otherwise facts will each be displayed in a single row.
The following options let you choose which events to display when you have checked the "Show relative events" checkbox above the fact list. It will include relative events that happened within the main person's lifetime.
•Show parent events - Show birth, marriage and death facts for the main person's parents.
•Show sibling events - Show birth, marriage and death facts for the main person's siblings.
•Show child events - Show birth, marriage and death facts for the main person's children.
•Show spouse events - Show birth, marriage and death facts for the main person's spouses.
Other Options
•Copy FamilySearch ID - This option copies the person's FamilySearch ID (if they have one) to the clipboard to paste into other programs.
•Copy selected fact - Moving or copying a fact to one or more other people in the file.
•Move selected fact - Moves the highlighted fact to another person in the file.
The Edit Panel
The edit panel on the right will allow you to edit different pieces of information depending on the type of row you are highlighting.
1.Person
oName fields – Edit the fields to change names, titles, etc.
oSex – You can change the sex of an individual. If you have accidentally entered a husband and wife backwards with the wrong sex, you can select "Swap husband and wife" from the edit menu to switch their sex.
oLiving – Mark this checkbox if the person is living, or uncheck it if the person is deceased.
2.Spouse
oHusband label – select the label (Husband/Father/Partner) you want used to reflect the couple's situation. You can also choose "Other" and RootsMagic will let you enter your own label.
oWife label – select the label (Wife/Mother/Partner) you want used to reflect the couple's situation. You can also choose "Other" and RootsMagic will let you enter your own label.
oProof – You can assign (optionally) a proof value to indicate whether you feel the labels like father, mother, husband, wife, or partner has been proven, disproven, or disputed
oPrivate – Check this box to denote that the label is private, and would not appear in reports and charts, unless you specifically select the option to include the private data. The default values would be used instead of the values selected and marked private.
3.Parents
oRelationship to father – select the relationship between the person and the father, from Birth, Adopted, Step, Foster, Related, Guardian, Sealed, or Unknown
oRelationship to mother – select the relationship between the person and the mother, from Birth, Adopted, Step, Foster, Related, Guardian, Sealed, or Unknown
oProof – Assign (optionally) a proof value to indicate whether you feel a relationship to the father or mother, has been proven, disproven, or disputed
oPrivate – Check this box to denote that the parent child relationships are private, and would not appear in reports and charts, unless you specifically select the option to include the private data. The default values would be used instead of the values selected and marked private.
4.Groups - A list of all the groups you have created. Mark checkboxes for groups the person is in, remove checkboxes for groups the person is not in. More information on groups.
5.WebTags - A list of WebTags for the person. More information on WebTags.
6.Facts - The following are fields which may be present for a fact. Not all field types are available for every fact type.
▪Fact type - Click the Fact type field to open a form to change the fact type. Be aware that you can't change an individual fact type (birth, death, etc) to a family fact type (marriage, divorce, etc) or vice versa.
▪Date - Enter the date for the fact. There are also 2 buttons to bring up a calendar or a date calculator. If you enter a date that RootsMagic does not recognize as a date, it will be displayed with a yellow tinge.
▪Place/Temple - Enter the place and/or temple. RootsMagic will display matches as you type. You can either complete typing, or select one of the matches from the list. There are also 2 buttons to bring up the place list or the gazetteer.
▪Place details - Enter the place details. While the place is usually city, state, country, the place details are more specific, like an address, or name of a cemetery, etc.
▪Status - The status field is only available on LDS facts. Simply select the desired status from the drop list.
▪Description - The description is a brief description of the fact. For example, an occupation fact you would enter the actual occupation here. For a death you might enter the cause of death.
▪Parents - This field is only available for Adoption and Sealing to Parents. It allows you to select which set of parents the adoption or sealing pertains to.
▪Proof - This is an optional field you can use to tell how sure you are of the fact (proven, disputed, or disproven).
▪Primary - Mark this checkbox to make the fact the primary fact of that type. For example, if you have multiple birth facts due to varying sources, you can mark this checkbox for the one you want to show on pedigree charts, etc.
▪Private - Mark this checkbox to make this fact private.
▪Name fields – The "alternate name" fact type has name fields (given, surname, prefix, suffix, and nickname) as well as a drop list to select the type of alternate name (also known as, immigrant, etc). A name fact will also have a Display option to choose how to display the name (in some cultures a person's name is displayed with the surname (or family name) first). The primary checkbox can be used to swap the current alternate name with the current primary name.
▪Sort date - The sort date lets you choose the order that facts will appear in. It is not displayed in reports, etc, but is used to determine the order facts are sorted.
Opening Multiple Edit Person Forms
RootsMagic will allow you to open up to 3 Edit Person forms at the same time. When an edit screen is open, RootsMagic will display the person's name on the status bar at the bottom of the main window. You can click any of the names to bring that person's edit form back to the front. When you close an edit person form, RootsMagic will remove the person's name from the status bar.
The status bar (and edit form names) are visible regardless of which page (people, places, sources, etc) is open, so you can easily work with a person's edit form no matter what you are doing within the program.
The Media View
The media view lets you view all the media attached to a person (general, facts, names, fact citations, etc.) in a single screen.
The Health View
RootsMagic lets you create a complete health history for any person in your file. You can track unlimited health conditions (illness, disease, accidents, etc.), including the onset date and unlimited notes for each condition. You can print Family Health History reports based on the information you enter.
•Entering and editing health conditions
•Printing a Family Health History
The DNA View
RootsMagic lets you track unlimited DNA matches for any person in your file, including provider, shared cM, test dates, unlimited notes and other information. You can print DNA Kinship lists and Leeds Method cluster reports based on the information you enter.